
User permissions are granted based on user roles.
Upon registration, examine the data submitted and verify (as best as you are able) that the user is legitimate. Malicious parties generally have user names that don't make sense, email addresses from questionable domains (e.g., Russia, Iran, and other uncommon suffixes). Be on the lookout for user names that aren't close to the email address and of user names ending in two or three capital letters.
NOTE: Most malicious parties will use gmail.com email addresses.
User access levels are defined as follows:
Public - What anyone can see.
Registered -Any registered user (non-USPS member).
Member - Any registered USPS member.
Executive Committee - Any member of ABC-FLX committees or boards.
Bridge Officer - Commander, XO, AO, SEO, Secretary, Treasurer, and any assistants to these officers.
Commander - The current squadron commander. Optional: Past commanders can be included in this category if desired.
Team - Proposed use for anyone working on special projects within the club.
Administration - Anyone involved in assisting with the administration of the web site and its content.
Admin Author - Anyone creating new content on the web site.
Admin Approver - Parties responsible for approving publication of new web site content.
Youth - Proposed for use with Youth Committee.
Youth Author - Anyone generating content for Youth activities.
Youth Approver - Parties responsible for approving publication of new youth web site content.
Student - Any current and former registered student in an ABC-FLX class.
Class - Each course gets its own access level. The name is the abbreviation for the class (MN, AMN, ON, CN, etc). This allows for read access to be controlled for each class that is offered.
Instructors - Any current squadron instructor.
Inst Class - Each class offered has its own access level. The level is named using the abbreviation for the class (MN, AMN, ON, CN, etc). This allows for read access to be controlled for each class that is offered. This access level can also be used to allow instructors to upload additional supplemental material to share with students. For some classes, such as ABC, this level will give read access to tests, answer keys, and other information that should not be made public or provided to students.
Super Users - Users that have no restrictions on the web site. This is generally reserved for one or two people who act as the webmaster and control all aspects of the site.
These are the steps needed to update the bridge positions after each change of watch:
- Collect photographs and biographies from each bridge and committee member.
- Create an article for each member to be featured.
- Article Title: Person's Name
- Photo: Left justify, set width to 250 pixels, add 5 pixels horizontal padding.
- Text:
- First line: Email address with link mailto:This email address is being protected from spambots. You need JavaScript enabled to view it.?subject=Web Inquiry.
- Past in biography text.
- Last line: BACK with hyperlink to index.php/about-us
- Article Category: - - About Us Details
- Access: Public
- Create/update a Hidden Menu item:
- Menu Item Name: Abbreviation for the office held (CO, XO, AO, SEO, ASEO, etc.)
- Menu Type: Single Article
- Select the article just created for the person in that office.
- Edit "About-Us" article:
- Update names for each office.
- Links to the hidden menu items should be OK since we pointed each menu item to a new article.
To set up a set of web pages for a class or seminar, use the following steps as a guide:
- Download all of the materials you will need for the course. This includes the Instructor Manual (IM), Student Manual (SM), PowerPoint presentations, videos, handouts, etc.
- It is recommended that you obtain a copy of the Instructor CD (or downloaded file) and create a single ZIP file of its contents for the instructor to download.
- Student files can be split up, but you should have at least the following:
- Student Manual (as a single ZIP or PDF file)
- All PowerPoint decks to be used in the class (as a single ZIP file)
- Homework questions with answer keys (as a single ZIP or PDF file)
- Any supplemental material.
- Upload the course materials using a suitable FTP client to a directory dedicated to the course.
- Directory path: coursematerial/<course-version> (where course is the USPS abbreviation for the class or seminar and version is the latest revision in the format of yymm (year and month) of the latest update).
- File names: It is recommended you keep the file names as they are assigned by National so as to make it easier to compare against future updates.
- It's OK to upload all of the files for the class or seminar into a single directory, but if the number of files becomes excessive, you may insert subdirectories as needed.
- Log into the administrative (back-end) side of the web site.
- Set up a new user group for the students that will be taking the course or seminar. If the course has been taught before, it may already exist.
- Users > Groups > Create New
- Group for the students: -Student-<course_id>
- Group for the instructors: -Student - Instructor - Inst-<course_id>
- Verify that each group has the correct parent (Student and Instructor, respectively).
- Set up access levels corresponding to the new groups:
- Users > Viewing Access Levels > Create new
- Student-<course_id>
- Inst-<course_id>
- Update the general Instructor Materials page to include the new items:
- Content > Articles
- Instructor Downloads
- Follow the format already in the document.
- Create a category for articles that will pertain to this class.
- Content > Categories > Add New
- Category Title: Class-<course_id> or Seminar-<seminar_id> or Local-<local_id>
- Access Level: Student-<course_id>
- Create a download page for the students:
- Content > Articles > Add New
- Title: "Student Downloads - <Course Title>"
- Category: Class-<course_id> [or the appropriate category created in step 7]
- Access: Student-<course_id>
- Type in the article body in a format similar to existing pages.
- Create a menu item pointing to the article above:
- Menus > Student Menu > Add New
- Title: Course Title [keep short enough to fit in the menu without wrapping the text, if possible]
- Access: Student-<course_id>
The most efficient way to upload information to the web server is via FTP (File Transfer Protocol). The recommended method is by using a package called FileZilla. FileZilla can be downloaded for any of the major computer platforms (Mac, Windows, and Linux). To establish a connection to the server, you need to set the following Configuration:
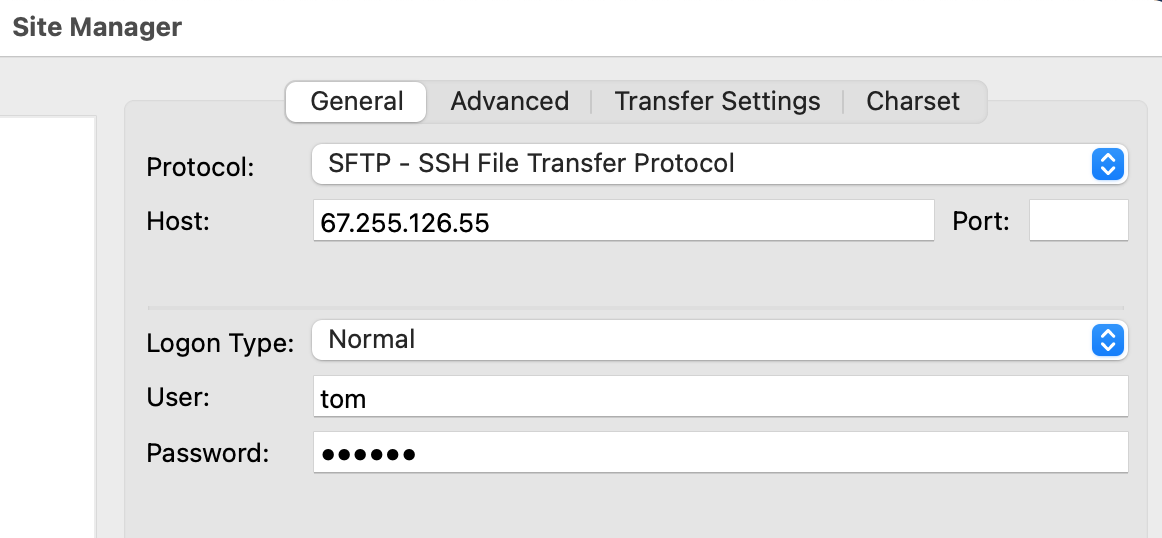
The actual user name and password will be assigned to you by the webmaster. The IP address shown in the "Host" field may change over time, too. Again, consult with the webmaster if things are not working properly for you.
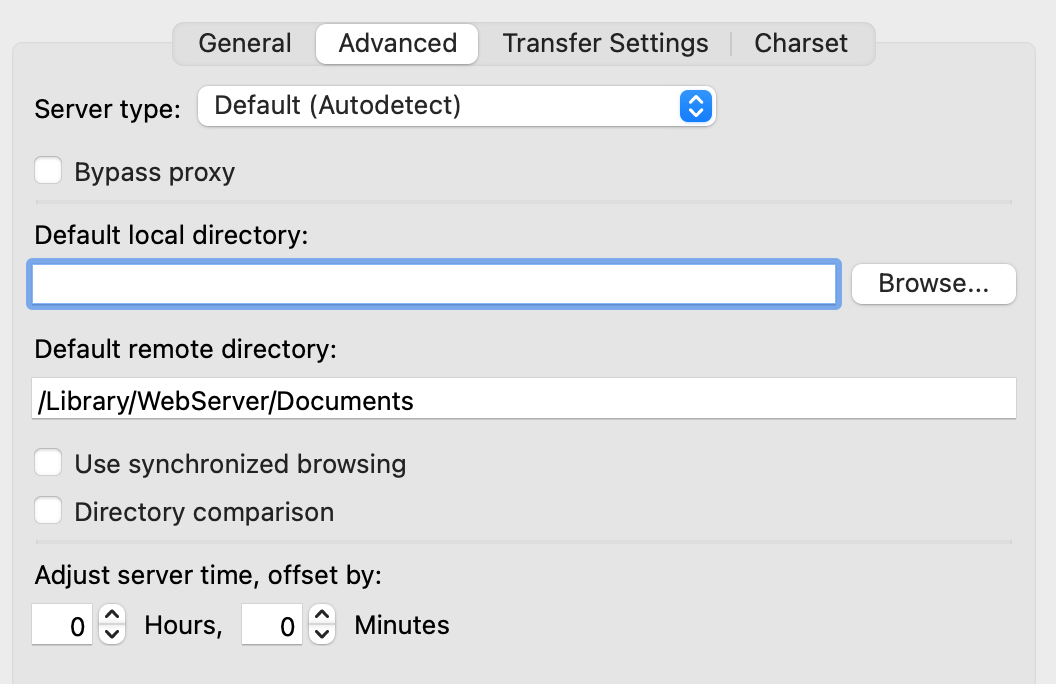
Under the "Advanced" Tab, things will be much easier if you set the default remote directory to: /Library/WebServer/Documents/ABC-FLX/
Click on "CONNECT" and you should see FileZilla connect to the site and you should see a screen similar to this:
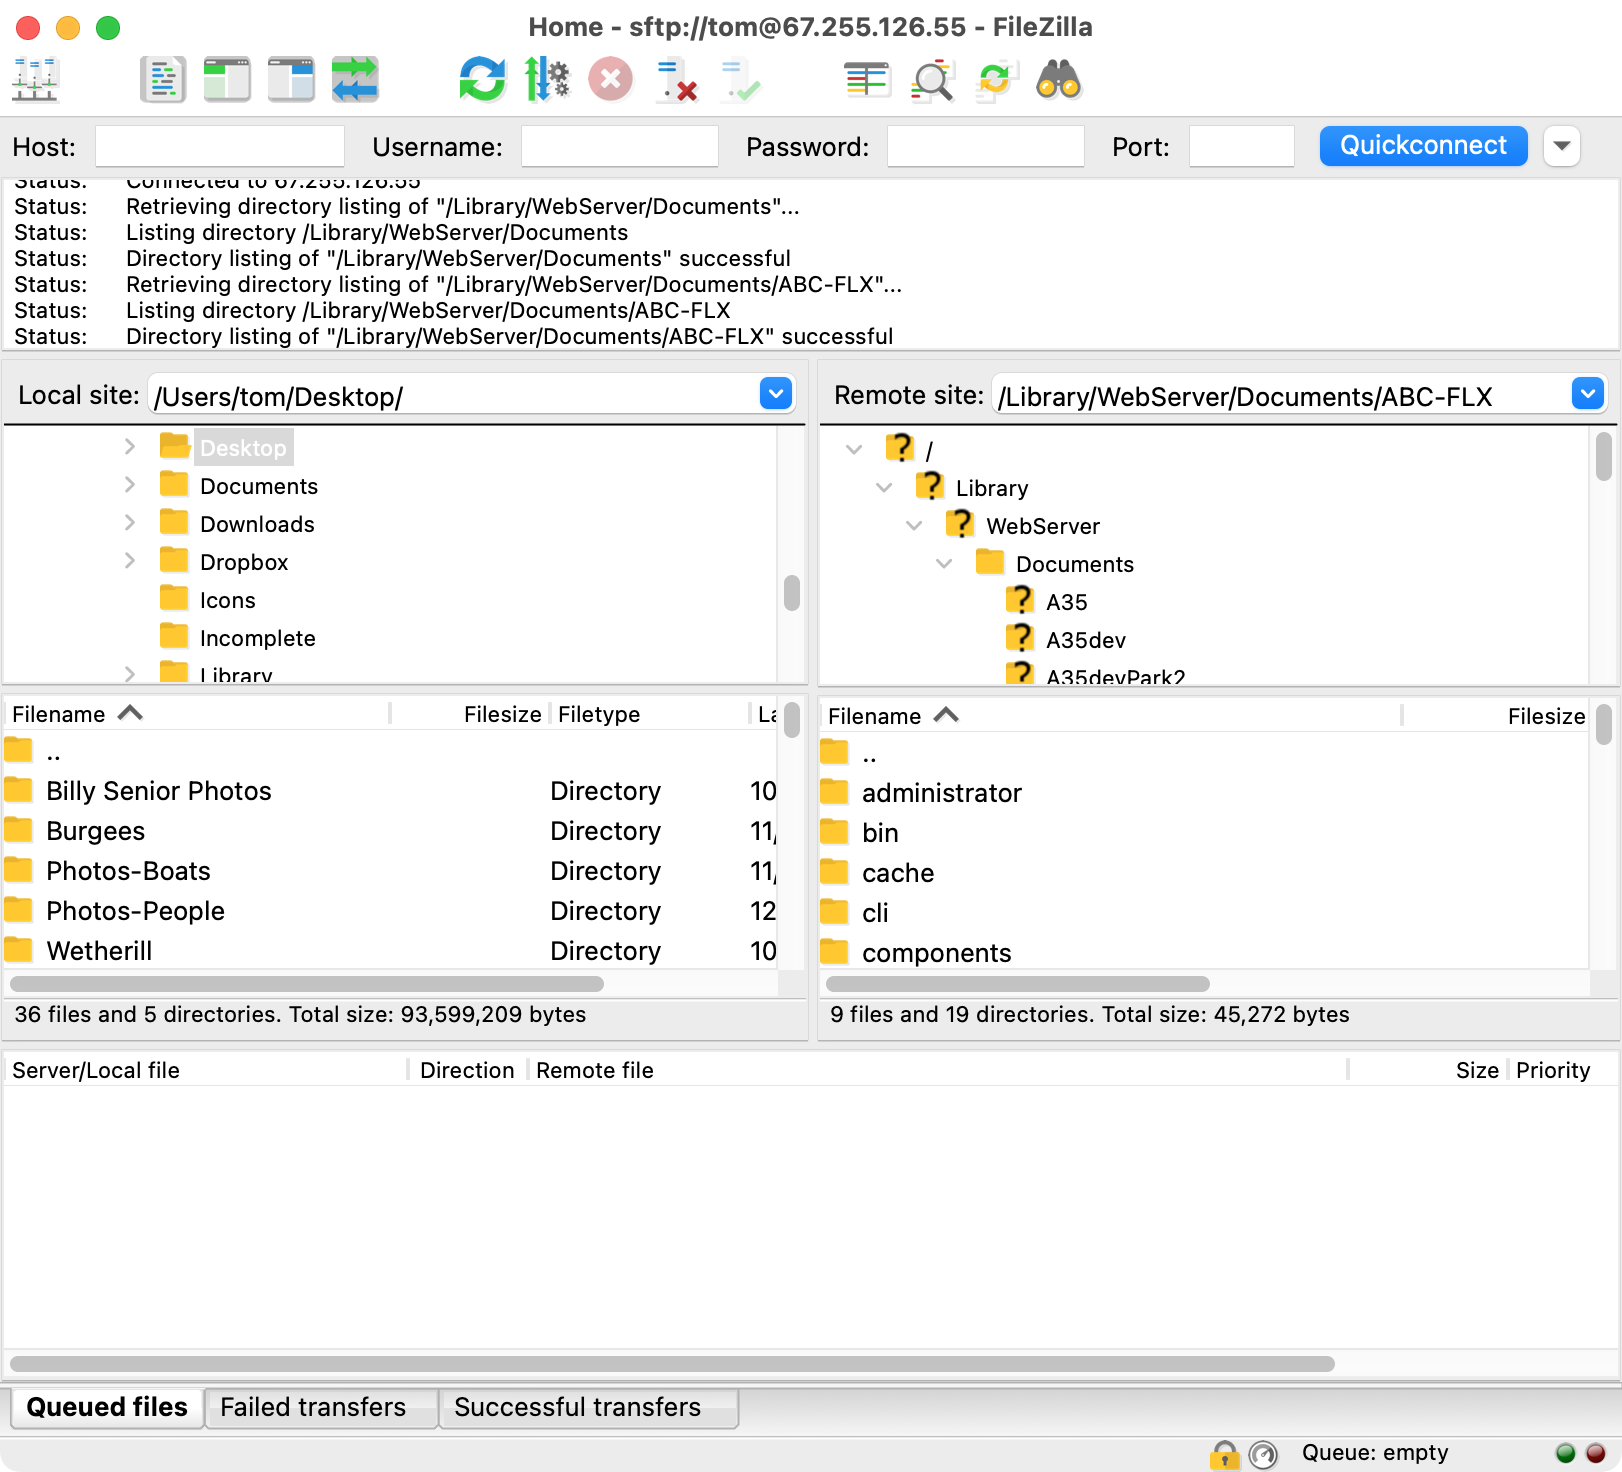
Now that you have a connection and that you are pointed to the correct directory on the server for this web site, you can upload files to it as needed.
Again, consult with the webmaster to make sure you comply with file naming standards and put files in the correct place(s). Failure to do so could cause problems with the web site's functionality.
- Log into the site.
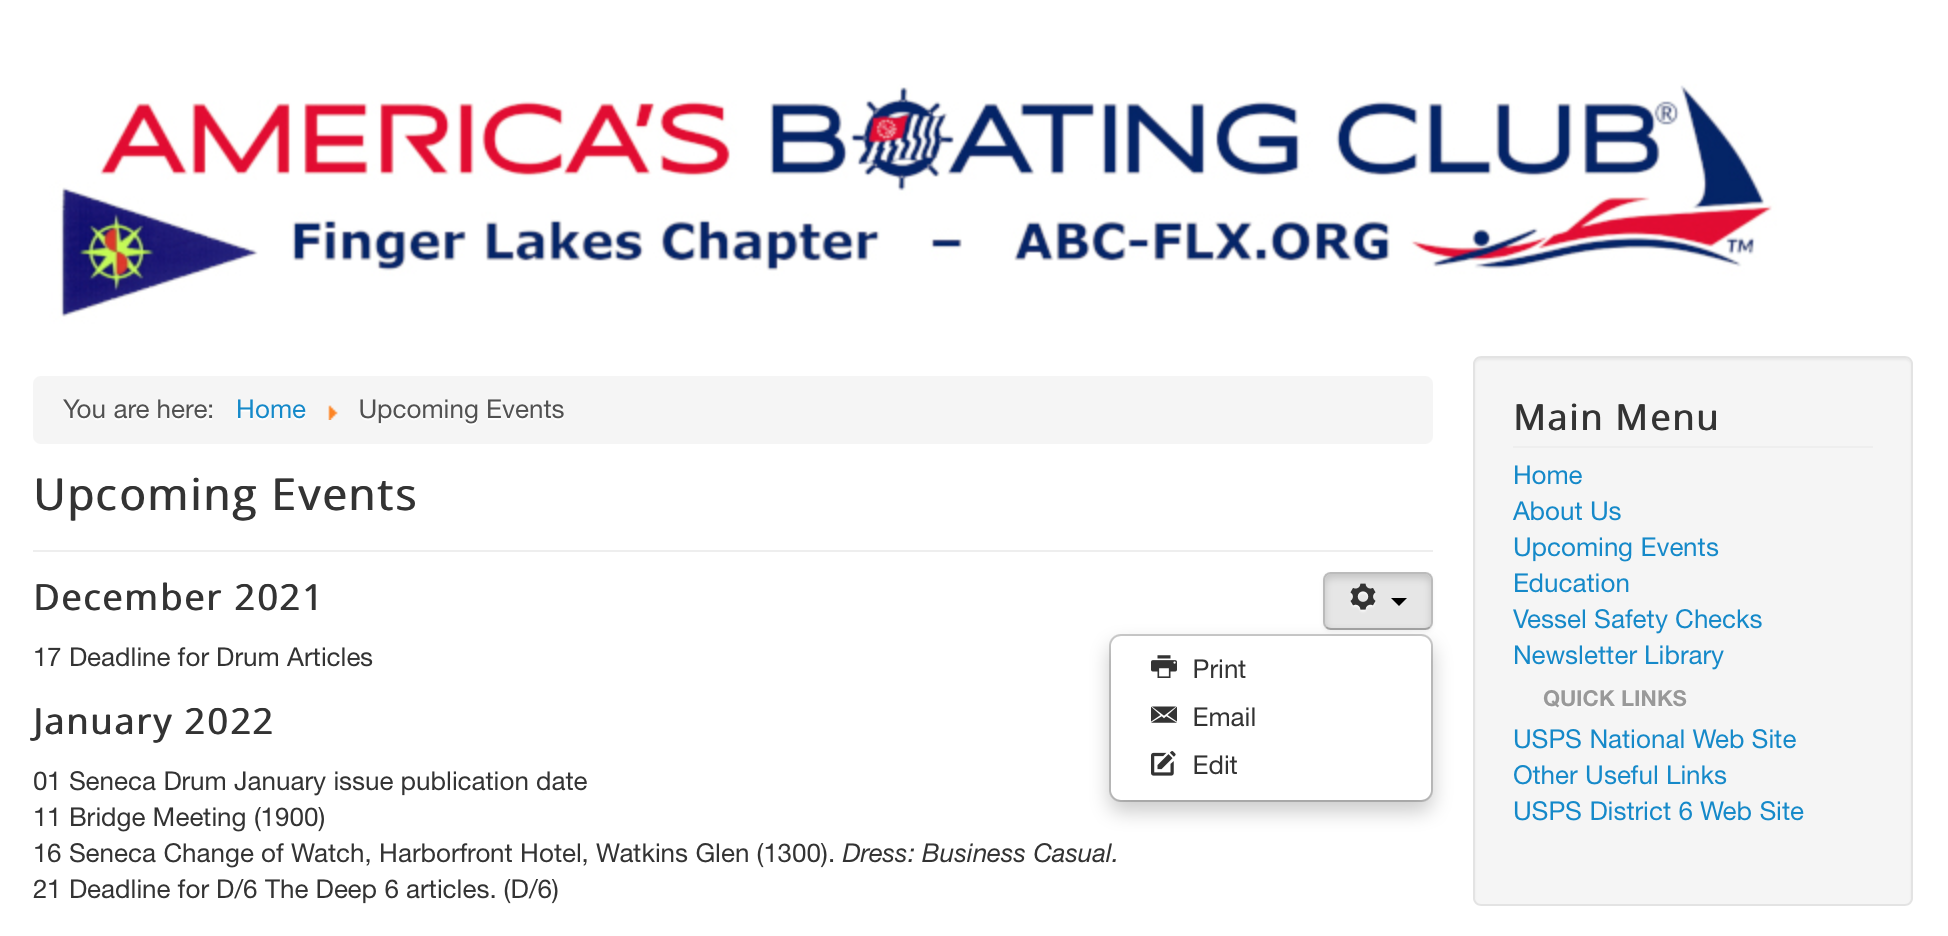
- Click on "Upcoming Events". This will take you to the club calendar.
- Click on the "gear" at the upper right of the calendar to get a drop-down menu. Select "Edit".
- Edit the document as needed. Some hints:
- To maintain line spacing in its current state, use the "break" function (<br />) in HTML for close-spacing lines.
- When finished, scroll to the bottom of the screen and click on the checkbox in "I'm not a robot" box. You may be challenged with a Captcha box to identify some images.
- Once the system is satisfied that you are not a bot trying to subvert site contents, you can click on the "Save" button.